Fluentd 基礎使用方式
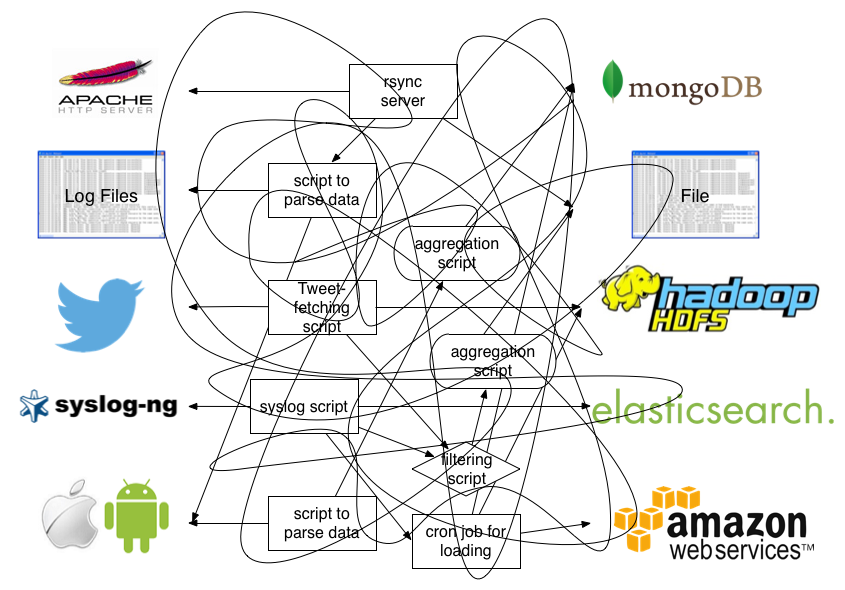
Fluentd 是一套開源資料蒐集軟體 (Data Collection Software)。通常在專案中我們會需要將各種資料傳遞到不同服務,如 Apache, MySQL, elasticsearch 等服務,但不同服務間的資料傳遞方式卻各自不同,常會造成混亂。
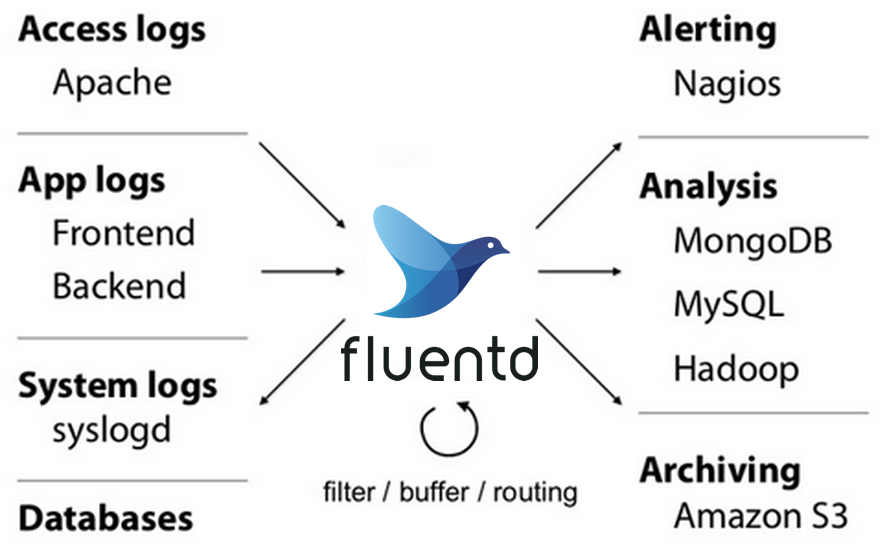
Fluentd 提供了統一的資料中介層 (Unified Logging Layer),可將資料由不同來源匯入後,經過 Buffer 與資料處理後再將轉拋到所設定的目的地,可大幅度降低系統間資料傳遞的複雜度。
Fluentd 還包含以下特色
- 由 C 與 Ruby 寫成。
- 資料以 Json 格式蒐集與轉拋。
- 支援多重 Input/Output 格式。
- 由多重 Plugin 組成,可自行加入非預設的功能。
- 透過設定檔設定資料處理流程。
td-agent
要使用 Fluentd 除了直接透過 Ruby Gem 安裝外,也可安裝 td-agent,由 Treasure Data 所維護的的發行版(The stable distribution of Fluentd),因此之後的使用範例均用 td-agent。
兩者的差異可參考此處
安裝 td-agent (Ubuntu)
可透過以下指令安裝
## Ubuntu 16.04 (Xenial)
curl -L https://toolbelt.treasuredata.com/sh/install-ubuntu-xenial-td-agent3.sh | sh

## Ubuntu 18.04 (Bionic)
curl -L https://toolbelt.treasuredata.com/sh/install-ubuntu-bionic-td-agent3.sh | sh
啟動 td-agent
安裝完成後可透過 systemctl 啟動系統服務(daemons)
# 啟動服務
sudo systemctl start td-agent.service
或透過 /etc/init.d/td-agent 啟動
# 啟動
sudo /etc/init.d/td-agent start
啟動完成後可透過指令查看運行狀態
# 查看狀態(systemctl)
sudo systemctl status td-agent.service

# 查看狀態(init.d)
sudo /etc/init.d/td-agent status
若啟動成功可看類似的訊息
Loaded: loaded (/lib/systemd/system/td-agent.service; disabled; vendor preset: enabled)
Active: active (running) since Fri 2019-12-20 02:40:54 UTC; 4h 15min ago
若要停止執行 td-agent 則可輸入
# 停止 td-agent (systemctl)
sudo systemctl stop td-agent.service

# 停止 td-agent (init.d)
sudo /etc/init.d/td-agent stop
安裝 plugin
Fluentd 可透過安裝外部 plugin 來擴充功能,可到 Fluentd 官網查詢可安裝列表,之後使用 td-agent-gem 指令來安裝支援該服務的 plugin 到 td-agent 中。
如安裝 elasticsearch 的 Fluentd plugin,可執行下列指令
td-agent-gem install fluent-plugin-elasticsearch
安裝完成即可使用該 plugin。
要注意版本與相容性問題。
Fluentd Config
Fluentd 的資料接收,資料處理與資料導出的資料流處理流程都透過設定檔來進行設定。而 td-agent 的設定檔位於/etc/td-agent/td-agent.conf。其中包含許多資料處理區間如
<source>
...
</source>

<match pattern>
  <filter>
  ...
  </filter>
...
</match>
該區間就是在定義 Fluentd 的資料來源與處理方式。不同區間代表不同的處理類型,如
- <source> - 資料輸入(Input)來源設定
- <match pattern> - 將 tag 符合 pattern 的資料輸出(Output)到設定的目的地。
- <filter>: 資料處理與過濾方式。
還有其他如 <parse>,<format>,<buffer> 等處理區間。
Example
<source>
  @type http
  port 9880
</source>

<match debug.**>
  @type stdout
</match>
上面的設定 Fluentd 會接收來自 port 9880 的輸入,並將 Tag 為 debug.* 的內容輸出到標準輸出。當透過指令輸入
curl -X POST -d 'json={"json":"message"}' http://localhost:9880/debug.test
可在 /var/log/td-agent/td-agent.log 看到如下的輸出結果
2019-12-20 16:44:50.034580000 +0800 debug.test: {"json":"message"}
代表從 9880 port 輸入的資料,被重新倒入到 td-agent 的標準輸出 td-agent.log 中
此外,<source> 和 <match> 也支援多種來源及目的地,如
# 由其他 Fluentd 輸入的資料
<source>
  @type forward
</source>

# 特定檔案的變動資料
<source>
  @type tail
  ...
</source>

# 將 tag 為 action.** 輸出到外部 Fluentd 服務
<match action.**>
  @type forward
  <server>
    name out-server-name
    host xxx.xxx.xxx.xxx # Hostname
  </server>
</match>

# 將 tag 為 run.** 的 資料依照 Buffer 的設定,每一天輸出到
# /var/log/td-agent/park_${time}.log.gz 的檔案中
<match run.**>
  @type file
  path /var/log/td-agent/park_
  compress gzip
  <buffer>
    timekey 1d # 每一天一個檔案
    timekey_use_utc true # 使用 utc 時間
    timekey_wait 10m # 在時間區段後隔多久寫入 path 中
  </buffer>
</match>
Routing
由於 Fluentd 的資料流為 Top-down 的方式處理,也就是若之前已經使用 <match pattern> 擷取資料,在之後的段落是無法取得已經被擷取的資料,因此可以透過相關 plugin 對資料做 Routing 以分流處理。
copy
透過 out_copy plugin 來將複製資料流到不同的 <match>區間中
# 將 parl.log 輸出至檔案以及外部的 Fluentd 服務
<match park.log>
  @type copy
  <store>
    @type file
    ...
  </store>
  <store>
    @type forward
    ...
  </store>
</match>
relabel
透過 out_relable plugin,將資料標註新 label 並在外部處理
<match park.log>
  @type copy
  <store>
    @type relabel
    @label OUTPUT_FILE
  </store>
  <store>
    @type relabe
    @label OUTPUT_FORWARD
  </store>
</match>

<label @OUTPUT_FILE>
  <match park.log>
    @type file
    ...
  </match>
</label>

<label @OUTPUT_FORWARD>
  <match park.log>
    @type forward
    ...
  </match>
</label>
測試 config 並重新啟動服務
當修改過 td-agent.conf 後可先測試該 config 設定是否可執行,只要在資料中
td-agent --dry-run -c [config-file]
即可測試特定設定檔是否可正常運作,若成功則可重新啟動 td-agent
# 重新啟動(systemctl)
sudo systemctl restart td-agent.service

# 重新啟動(init.d)
sudo /etc/init.d/td-agent restart


