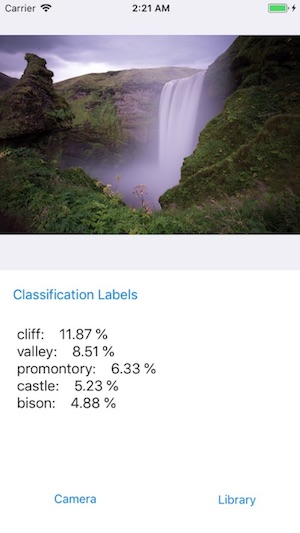
使用 TensorFlow Lite 在 iOS 裝置上進行圖片分類
近幾年來由 Google 推出的 TensorFlow 在深度學習等領域有著大量的發展,但也因為由 TensorFlow 所訓練出的 Model 容量大且本身執行時也會佔用較多資源,並不適合在行動裝置上執行。因此 Google 推出了 TensorFlow Lite 讓在行動裝置上執行 TensorFlow 更為方便。本文章將簡單介紹如何在 iOS 裝置上執行 TensorFlow Lite 並進行圖像分類的方法。
TensorFlow Lite
TensorFlow Lite 是 Google 基於原先 TensorFlow Library,為行動與嵌入式裝置所推出的輕量化版本,有著較低的功耗以及記憶體空間消耗。在執行時 TensorFlow Lite 並不直接使用 TensorFlow 訓練好的模型,而是會先轉換為使用 FlatBuffers 建立的新格式以減少 Model 的大小(通常命名 *.tflite)。
在 Xcode 專案中使用 TensroFlow Lite
使用 CocoaPods 安裝
要在 iOS 中使用 TensorFlow Lite,最簡單的方法就是使用 CocoaPods 來引入相關函式庫與連結檔。方法為安裝 CocoaPods 套件後(可使用 Homebrew 安裝),在 Project 資料夾下執行
pod init # 初始化 CocoaPods 並建立 Podfile
執行完成後會自動建立 Podfile 檔案,接著編輯該檔案並在其中加入
pod 'TensorFlowLite' # 安裝 TensorFlowLite library
完成後回到 command line 介面後執行
pod install # 安裝 Library
安裝成功後會自動建立 *.xcworkspace 檔案並引入 TensorFlow Lite 相關函式庫。
從原始碼編譯 TensorFlow Lite
除了使用 CocoaPods,也可以從原始碼重新編譯 TensorFlow Lite。要在 Mac OS X 上編譯 TensorFlow Lite 需先安裝 Xcode command line tools,此外也需使用到 automake 與 libtool 這兩個套件(一樣可透過 Homebrew 來安裝)。
# Install Xcode command line tools (for i)
xcode-select --install

# Install automake and libtool
brew install automake
brew install libtool
取得 TensorFlow 原始碼
使用 Git 從 Github 上取得 Source code 或直接下載
git clone https://github.com/tensorflow/tensorflow.git
安裝完成後切換到 TensorFlow 的資料夾中
編譯 TensorFlow Lite
在 TensorFlow 的 root folder 位置執行以下指令
# 下載取得相依元件
tensorflow/contrib/lite/download_dependencies.sh

# 編譯 TensorFlow Lite
tensorflow/contrib/lite/build_ios_universal_lib.sh
若編譯成功則可在 tensorflow/contrib/lite/gen/lib/libtensorflow-lite.a 找到連結檔的位置。
如在執行
build_ios_universal_lib.sh時出現no such file or directory: 'x86_64'的錯誤,須在 Xcode > Preferences > Locations 中開啟Command Line Tools的選項。此外因 Tensorflow 的 master branch 是開發中的分支,可能在編譯時會出現錯誤。可先將版本切到其他版本來進行編譯試試看。
設定連結
編譯完成後,須先在 Xcode 的 Project 中設定連結在能專案中正確使用 TensorFlow API
Project 設定
- 在 Header Search Paths 中加入以下 folder 位置的路徑。
- TensorFlow Code 的 root folder 位置
tensorflow/contrib/lite/downloadstensorflow/contrib/lite/downloads/flatbuffers/include
- 在 Library Search Paths 加入以下 folder 位置的路徑。
tensorflow/tensorflow/contrib/lite/gen/lib
Target 設定
- 將
libtensorflow-lite.a的連結加入 Build Phases 設定中的 Link Binary With Libraries 裡。
設定完成即在可專案中呼叫 TensorFlow Lite API。
因 TensorFlow Lite 的 API 使用 C++ 寫成,若要在 Objectvie-C 中使用需將呼叫的檔案設定為
*.mm讓 Xcode 使用 C++ 來編譯。若使用 Swift 來開發則需透過 Objective-C++ wrapper 的方式呼叫,相關方式可參考此篇文章。
使用 Tensorflow Lite API
因 TensorFlow Lite 的 API 使用 C++ 寫成,若要在 Objectvie-C 中使用需將呼叫的檔案設定為 *.mm 以讓 Xcode 可編譯 Objective-C++ 語法。若使用 Swift 來開發則需透過 Objective-C++ wrapper 的方式呼叫,相關方式可參考此篇文章。下面程式碼範例部分參考 TensorFlow Lite 的官方 iOS 範例。
匯入 Model 檔案到 Xcode 專案中
在使 TensorFlow Lite 前,須先引入 TensorFlow Lite 可使用的 model file ( *.tflite),在此我們直接使用 Google 所提供的 mobilenet_v1_0.25_128 Model,將檔案下載並解壓縮後將 mobilenet_v1_0.25_128.tflite 與 labels.txt 複製到專案中。此外也可從自行下載下載其他模型使用。。
讀取 TensorFlow Lite Model
使用 NSBundle 中的 pathForResource function 取得 model 檔案路徑後建立 model 物件。
auto graph_path = /* Get model path */
auto model = tflite::FlatBufferModel::BuildFromFile(graph_path.c_str());
建立 Interpreter
建立 Interpreter 物件,並設定所要使用的 model。
auto interpreter = std::make_unique<tflite::Interpreter>();
auto resolver = tflite::ops::builtin::BuiltinOpResolver();
auto builder = tflite::InterpreterBuilder(*model, resolver);
builder(&p_interpreter);
初始化 Input Tensor
在執行需先建立 Input tensor,設定維度後分配記憶體空間。因 mobilenet 的模型為 224 * 224 * 3 的圖片,引此維度需設為 vector<int>{1, 224, 224, 3}。
// 設定 Input Tensor 的維度
interpreter->ResizeInputTensor(interpreter->inputs()[0], vector<int>{1, 224, 224, 3);

// 建立 Input Tensor 的記憶體空間 (ResizeInputTensor() 後一定要執行)
interpreter->AllocateTensors();
設定資料到 Input Tensor
要設定資料到 Input Tensor,可先取得資料的初始 address 後,計算 Raw Data 中對應的位置後將資料傳入 Input Tensor 中。
// 取得輸入的資料初始 Address
float* out = interpreter->typed_tensor<float>(interpreter->inputs()[0]);

// Raw data 的資料的初始位址
uint8_t* in = raw_data.data();  // raw_data: 原始資料的 byte array

// 設定 model 與 input data 的寬度,高度與 channel 數量
size_t model_height = 224; // Model 的輸入高度
size_t model_height = 224;  // Model 的輸入寬度
size_t model_channels = 3;  // Model 的輸入 Channel 數
size_t image_width = /* Input data 的高度 */;
size_t image_height = /* Input data 的寬度 */;
size_t image_channels = /* Input data 的 Channel 數 */;

float input_mean = 127.5f;
float input_std = 127.5f;

// 計算每一個 input data 對應的 input tensor 位置,並將 data 設定至 tensor 中
for (int y = 0; y < model_height; ++y) {
    int in_y = static_cast<int>(y * image_height / model_height);
    uint8_t* in_row = in + (in_y * image_width * image_channels);
    float* out_row = out + (y * model_width * model_channels);
    for (int x = 0; x < model_width; ++x) {
        const int in_x = static_cast<int>(x * image_width / model_width);
        const uint8_t* in_pixel = in_row + (in_x * image_channels);
        float* out_pixel = out_row + (x * model_channels);
        for (int c = 0; c < model_channels; ++c) {
            // 正規化輸入資料
            out_pixel[c] = (in_pixel[c] - input_mean) / input_std;
        }
    }
}
執行 TensorFlow Lite Model
當資料設定完成後可呼叫 Interpreter::Invoke() 函式執行 Model。
// 使用 Invoke() function 執行設定 model,並確定狀態是否執行成功。
interpreter->Invoke()
取得執行後的結果
若執行成功可得出 MobileNet 的中對應每個 Label 的 score 資訊(Label 的資訊存在 labels.txt 中)。
// 取得 output tensor 初始位置
float* output = interpreter->typed_output_tensor<float>(0);

// 使用 output 資料建立 Score vector
auto scores = vector<float>(output, output + 1000); // mobilenet 共有 1000 個 labels
顯示結果
在這裡我們用一個簡單的範例來顯示對圖片進行分類的結果。下方 Label 代表使用 MobileNet 分類結果的 Top 5,Label 右方的數值為可能性百分比。

